Pages

Wednesday, 29 May 2013

CMM70 | Rubber Stamps Challenge - My Pop-Art Technique

I was going to post my pop-art stamping technique anyway, so this rubber stamps challenge is perfect timing!

I would usually just use 4 squares and one stamp for this type of card (as the last photo), but I have taken it another step especially for this challenge. 


You will need:
  • White and black card
  • 2" square punch or die-cut
  • Small stamp(s) to fit within the square (outline stamps are best)
  • 4 Dye-based inks (primary/secondary colours work well)
  • Watercolour pencils to match the inks, plus a brush and water
  • A blank card
  • 3D foam squares/glue/double-sided sticky tape
  • A sentiment that works well with the stamp (any type) 
Step-By-Step:
  1. Punch/die-cut squares from white card.
  2. Ink the squares in each different colour (one or two different stamps will be sufficient).
  3. Once all the squares are inked and dry, colour them with the watercolour pencils.  Start with a rough border, then colour over the outline of the stamp and any details you'd like to pick out. 
  4. Now take your brush and wash over each square completely with water. This will blend the colour across the white areas left behind.  Allow to dry.
  5. Take your black card and arrange the squares so there is a little gap between each one.  This makes the colours really stand out.  Attach them however you like.  (I have added extra dimension to this card by using 3D foam squares for the butterflies - photo 5a).  Trim the black card to fit.
  6. Now attach the matted squares to your card and add an appropriate sentiment.  This can be stamped or any method you choose. 


Saturday, 18 May 2013

Crafty Cardmakers Challenge: #91 Pick Three Different Techniques

This challenge required the choice of three techniques from a list.  I have chosen heat embossing, distressing and masking. 
I took some Core'dinations ColorCore card and tore roughly to fit my card.  I then screwed it up, unfolded it and sandpapered it for a distressed look before sticking it to the card. 
Next I cut an oval from some white card and stamped three cupcakes onto it.  I then masked these and stamped two more 'behind'.  I coloured these with watercolour pencils. 
I used an embossing pen to mark the edge of the oval and heat embossed with silver, then stuck it to the card.  The final touches were some heat embossed silver flowers and a couple of strawberries. 
http://craftycardmakers.blogspot.it/2013/05/91-pick-three-different-techniques-read.html

Friday, 17 May 2013

Anything Goes Card Makers Challenge

Anything goes is always hard as there is just too much to choose from!

I decided to use a Papermania stepper card as they are interesting to look at and so different from normal cards.

Going with a Strictly Party theme, I first layered up the decoupage using 3D foam stickers.  I then used X-Cut Multi-Shaper punch in Lace to border punch the entire length of each side of the card.   The same was done to Scrumptious patterned paper, to fit along the centre of the front of the card.

I aligned the decoupage so the top portion was above the first step and added an outline sticker sentiment below.    
Next I matted the Strictly Party sentiment onto pale blue card using 3D foam stickers, then onto the card at the top of the second step, also using 3D foam stickers.
I added a final touch with some clear adhesive stones to give an extra sparkle.


Wednesday, 15 May 2013

Card Makin' Mamas Challenge #69 | PUNCHES

This challenge is to create a card using punches. I've chosen to use just one, as it's so versatile (X-Cut Multi-Shaper Punch - Lace).  
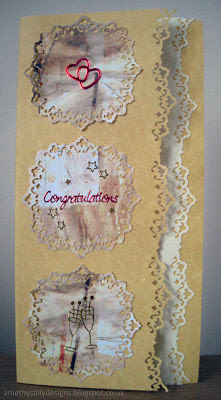
I started by punching a border at the edge of a tall card, then also onto parchment paper.  I layered the parchment paper over the top of the card and wrapped around, only glueing at the back so the front stays free.  I then glued another piece of the parchment paper behind the punched edge of the card to make it stand out more.  I used some patterned paper which matched the colour of the card and the parchment and punched into three squares.  I then glued only the centre of these to the card. Again, so the lace edge stays free.  I used some outline stickers for the sentiments, giving some contrast by colouring a couple red.

Tuesday, 14 May 2013

Scrapbooking & Fonts

I have always had a fascination with different fonts, but more so since I've been scrapbooking.  A layout can be changed dramatically with the right font used for the title and even for journalling - a lovely handwriting font can make all the difference if your own writing isn't that great. 
My favourite place to search for fonts is www.fontspace.com. They have thousands of free fonts to download.  All you need to do is search for a style relating to your theme. You can even type the text you want to use and the site will show each font using that text, so you can immediately see what will work best.
There are of course many other sites, but a lot of them charge for downloading the fonts. Since searching many myself, and finding this one, I haven't found the need to look for any others. 
Happy font-hunting!

Hello!

I figure that's a good place to start for my first ever blog post.  I will be blogging about my crafting plus gadgets, tools, websites and everything that I love related to craft.