Pages

Wednesday, 31 July 2013

Seaside Rocking Stepper Card

We are actually having quite a good summer this year for a change and seeing as I used to live by the sea, I thought I'd make a seaside-inspired card. 
This rocking stepper card is decorated using the Seaside Greetings kit designed by Alice Potter, available from Papercrafter magazine.

First I made the circular stepper card using a template from The Paper Craft Tutor.  It has a great rocking action when folded, which is perfect for the theme. 
Next I painted PVA glue on the little wooden fish, dipped them in the gold glitter and put them aside to dry. 
To decorate the back steps I used anchor patterned paper, first glueing then trimming to shape.
I glued a paper strip to the rectangular portion of the step, to represent the sky and the beach, then cut out the wave shapes from patterned paper and attached them in three levels with 3D foam pads to represent the sea. Once the fish were dry, I glued them in place on the 'sea' along with a boat shape. 
To finish off the seaside theme, I glued a beach hut to the 'sand'.

I would like to enter this card into the following challenges:


Monday, 29 July 2013

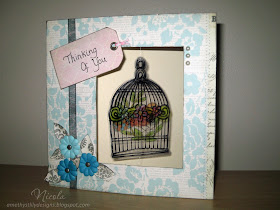
Suspended Birdcage Frame Card

Even with a fairly large supply of crafting materials,  I sometimes feel stuck in a rut using the same things all the time.  However, I can't always afford to stock up on new kit so that's when I turn to magazines. 
Not only do they have some great freebies, but they also give inspiration and ideas for how to use them. 
For this card I have combined freebies from two different magazines:
1. Simply Cards & Papercraft issue 113 - Melissa Frances cardmaking kit
2. Crafts Beautiful issue 257 - stamp set
I have also used embellishments from DoCrafts and Dovecraft.

First I used Stazon Jet Black ink to stamp the birdcage image onto acetate.  I allowed to dry, coloured with permanent pen then cut around the image. 
I cut a 15cm square cream card and placed the acetate on top to work out where I wanted the cut-out section to be.  I measured the bird cage, allowing for a centimetre extra each side, then drew a rectangle on the card. I cut this out using a craft knife and metal ruler. 
Once I had my cut-out section, I cut patterned paper to match the front and cream card to fit behind.  I glued the patterned paper to the card and inked all the edges then attached the birdcage behind using invisible thread and sticky tape. With the card closed, I drew lightly around the birdcage, stamped the bird image inside then rubbed out the pencil.  I coloured the bird with watercolour pencils and brushed with water. 
To decorate the front I used double-sided tape to attach some black ribbon down the left side of the card and stuck three pearls to the top right of the cut-out. 
I created a tag from patterned paper and glued it to card, inked the edges, hand-wrote a sentiment and added an eyelet and twine to finish off before attaching it to the card with 3D foam pads. 
I drew some leaves on the back of patterned paper, cut them out and inked the edges before bending them to give depth.  I arranged them with some paper flowers and glued them in place, attaching the flowers with brads. 
To finish off, I glued the cream card behind to give strength and cover up the sticky tape. 

I would like to enter this card into the following challenges:
1. Great Impressions - Anything Goes
2. Challenges 4 Everybody - #25 Anything Goes
3. Crafter's Café Challenge Blog - 21 Anything Goes
4. My Time To Craft - #230 Sympathy
5. One Stop Craft Challenge - #236 Flowers & Ribbon


Sunday, 28 July 2013

Wedding Heart Easel Card

I have a friend who commissions many cards from me who has just requested a wedding card.  It's been a while since I did something for a wedding so I thought I'd make her something a little more special. 

This heart-shaped easel card was embellished with Papermania Colossal patterned paper, Forever Friends 'With Love...' papers, vellum paper, Trimcraft 'Fizzy Moon' chipboard elements and clear gemstones. 

First I created the card shape and cut all the hearts I needed for embellishments. I then folded one side of the main card to create the easel stand. 
Next I glued all the patterned papers to the hearts and inked the edges. Using Microsoft publisher I drew a heart shape the same size as my card and worked out where the embellishments would be before typing my wording.  I used Edwardian Script which is perfect as a wedding font.  Once I had the wording positioned, I deleted the heart shape.  
I've always found printing on vellum to be a bit of a nightmare, as printers don't recognise it on its own and it doesn't always work well attached to paper.  The best way to overcome this is to use double-sided tape to stick the edge of the vellum about 1cm from the leading edge of the printer paper. Also stick the other end so it doesn't skew when feeding.  This allows the printer to recognise and feed the paper, then print onto the vellum. 
Once my wording was printed, I laid the vellum over the single large heart in the position I wanted it then attached all the embellishments.  I then used double-sided tape on the underside of the vellum where the embellishments were so it couldn't be seen, before sticking it to the heart. I then cut the vellum to the heart shape and used some Glue Dots Micro Dots around the edge to keep it secure. 
To finish off the card I layered up the remaining three hearts with 3D foam pads and added a gem before sticking them to the bottom heart to create a stopper. 

I would like to enter this card into the following challenges:
1. The Crafter's Cafe - Challenge 21 Anything Goes
2. Challenges 4 Everybody - #25 Anything Goes
3. Divas by Design - Anything Goes


Friday, 26 July 2013

My Little Shop

Crafting is a great passion of mine and I take pleasure in every card I make. I do tend to make more cards than people I know to give them to though, so I also sell to family, friends and the local community.
Having sold many cards on my recent trip to Canada, I've decided to reach a wider audience and have opened an Etsy shop with worldwide delivery. 

Feedback and support would be greatly appreciated during my first steps in this new venture.  If you own or love any Etsy shops, please let me know and I will gladly take a look. 

Many thanks
Nicola

Sunday, 21 July 2013

Cascade Card

Tri-fold cards are a great way to create impressive designs, just using a single sheet of card. 
To decorate this card I have used Crafter's Companion Frou Frou Collection, which you can download for free when you sign up to Club Inspire.
First I made the card by trimming A4 white card to 27cm, then scoring and folding to create three panels of 9cm. To create the 'waterfall' effect, I trimmed at a diagonal to take the corner off the front two panels. 
I printed all the embellishments onto white card and the patterned papers onto white paper, then cut everything to size, inking the edges of the paper before glueing to the panels. 
To decorate the butterflies, I used black wire for antennae and coloured gems for the bodies.  I arranged everything onto the card to make sure I was happy with the layout before glueing down. Some elements are glued directly and some using 3D foam pads to give the card more dimension. 

I would like to enter this card into the following challenges:
1. Polkadoodles - Week 29 Let It Fly
2. Great Impressions - Anything Goes
3. Crafty Cardmakers - Birthday
4. Imagination Crafts - Anything Goes


Home Grown Fusion

For this card I have used Hot Off The Press 'Home Grown' papers & die-cuts (free with Simply Cards & Papercraft Issue 112) and the photo from Fusion Card Challenge #13.  I have combined the photo with the sketch to create a fusion card.

First I printed the birds twice onto white card, then cut individual birds from one of the images.  I attached these onto the other image using differing height 3D foam pads to give dimension. 
I chose three of the patterned papers and cut them to the desired size and shape for my design, then inked the edges with black.  I assembled the pieces to check spacing before glueing them all down. 
I glued the birds to the right side of the daisy paper and added some flowers to the top left corner with 3D foam pads.  To finish off I used a sentiment banner with an outline sticker sentiment, which I coloured with brown pen. 


Thursday, 18 July 2013

First Christmas!

This is the first Christmas card I've made this year, the first time I've used an acetate wrap on a card and the first time I've used StāzOn® ink.  So please forgive the stamped images as they're not as crisp as I would've liked. 

I used a gold card blank and cut the acetate to fit the front, overlapping slightly, then scored and folded to create a fixing tab. 
Using a poinsettia stamp and Jet Black ink, I stamped images to cover the whole of the acetate.  Once the ink was dry, I coloured the images on the reverse side with red and green permanent pens. 
I added an outline sticker sentiment to the card so it would show between the poinsettia, then attached the acetate to the card. 
To finish off I added some twine and a bow to the left side of the card. 

I would like to enter this card into the following challenges:
1. Fab 'n' Funky Challenges - #179 Christmas In July
2. Great Impressions - Anything Goes
3. Imagination Crafts - Anything Goes


Wednesday, 17 July 2013

Summer Brights Card - Using Fiskars ShapeCutter™

I've had the Fiskars ShapeCutter™ for quite a while now but don't often use the butterfly and flower layering templates.  These are great for making bright, summery cards for children and there are many other examples of what you can achieve in the Fiskars project gallery.

I started by making a large card from light blue, textured cardstock then I cut out the elements I needed from different coloured card.  I used the Butterfly 2 and Flowers templates. 
To give the design some detail I drew a stitched effect round the edges of all the shapes, adding further detail to the butterfly's body and face, the leaves and flower centres. 
I used double-sided tape in the centre only to layer the butterfly.  This allows the wings to 'flap'.  To add more dimension, I used 3D foam squares to layer the flowers. 
Once all the elements were layered, I arranged them on the card to check spacing before glueing them down.  Some elements were glued directly and some with 3D foam pads.  The finished effect is bold and striking and would make a lovely framed picture. 

I would like to enter this card for the challenge Joanna Sheen - Citrus Colours

Monday, 15 July 2013

Girly Steampunk Birthday

After recently purchasing Simply Cards & Papercraft magazine, I discovered Debbi Moore and had a browse through her website. I found some wonderful steampunk images within the free downloads section, so thought I'd put some to use. 

I first created a stepper card using textured dark turquoise card.  Then I chose the images I wanted to use and printed them to the size I needed, adding wording to the plaque.
I inked each edge and fold of the card and lightly inked over the whole front to show off the texture and give it a more distressed look.  To give a different texture and colour, I glued wood-grain effect paper to both small steps. 
On the left step I added a gromlet to the cogs image and attached with 3D foam squares.  On the right step I added button images using different thickness 3D foam squares. 
I matted my main image onto light turquoise then dark brown card and glued slightly higher than the top fold.  I added large brads to the plaque and attached it below using 3D foam pads. 
To make the card a bit more girly, I inked some paper flowers and attached them using brads and eyelets to each side of the plaque. 

I have created this card for the following challenges:
1. My Time To Craft: #229 Colour Combo
2. Creative Craft Challenges 2: Challenge 14 - Numbers
3. Daring Cardmakers: Ombre
4. Crafty Cardmakers: #96 Birthday


Saturday, 13 July 2013

Surf's Up - Circle Easel Card

I have always made my cards from bought card blanks, but recently have decided to try some different shapes and have started making my own cards.  
This is my first circular easel card.

First I made a basic 5" circle card blank from white cardstock, plus an extra circle the same size.  I then mountain-folded the front of the card in half.
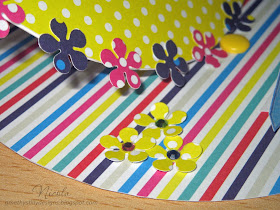
Using Papermania Capsule Collection Spots & Stripes Brights, I covered the bottom section in striped paper and the extra circle in yellow spotty paper. 
For the image, I printed a free digi-stamp from Simply Cards & Papercraft (by Polkadoodles) and coloured it with pencil crayons.  I made the sentiment by printing the wording within a surfboard shape, which I also coloured with pencil crayons.  I gave the surfboard a little tab at the bottom so it would stand up. 
I decorated the yellow circle around the edge with mini blossoms punched from two of the other patterned papers, with some petals over the edge of the card.  I added another two of the blossoms to the surfer's hair using a mini brad, then attached the picture to the card using 3D foam squares. 
I glued the yellow circle to the easel and attached a large yellow brad on the bottom of the card to make it stand up.  Then I attached the surfboard sentiment by its tab at the front of the bottom section. 
To finish off the card, I glued mini blossoms around the sentiment and added little gems to their centres.

I have created this card for the following challenges:
1. Polkadoodles Week 28 - Summer Fun
2. The Crafting Cafe - Summer's Here
3. DoCrafts Blog - Crafty Challenge: Anything Goes
4. Imagination Crafts Challenge 1 - Anything Goes


Thursday, 11 July 2013

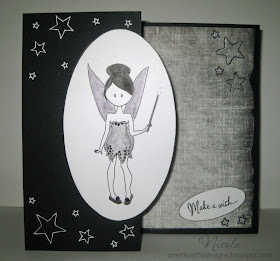
CMM72 | Monochromatic

Working with a single colour tone can really make a card stand out. It lets you play with many shades, without getting too complicated or fussy by using too many different colours. 
I have chosen to use what I think of as true monochrome: black & white/grey-scale. 

First I made a black square card, then folded the front back on itself to create a more interesting shape. Then I cut some patterned paper to fit the back section and glued into place. 
I printed a fairy digi-stamp (free download via Simply Cards & Papercraft), plus a sentiment and different-sized stars onto white card. I cut the stars out using a craft knife so I could use them as stencils. 
I coloured the fairy with watercolour pencils and water then allowed to dry. Once dry, I decorated with black and white glitter to add detail and glued to the front panel of the card, overlapping slightly.  I then glued the sentiment to the bottom right corner of the back panel. 
Using the stencils, I placed stars and first drew with pencil so I could re-position if necessary. I then drew over the lines with white pen. I filled the stars on the back panel with PVA glue then covered with white glitter.  Once dry this went a bit see-through and didn't stand out that well, so I outlined with black pen. 

Wednesday, 10 July 2013

Never Ending Folding Card

The Never Ending Folding Card by Papermania is a simple way to create a visually stunning card, and is easier than you might think. You can view a tutorial here.

All the decorative elements from this card come from Crafter's Companion.

First I assembled the card as per instructions and started decorating the front. I stamped the dahlia in each corner and in the centre using black ink.  I then masked these off and stamped additional flowers in purple ink, masking each time I stamped a new image, until the front of the card was covered. I printed a sentiment, cut it in half and glued to the centre of the card. 
Opening up to the next 'page' I used flower patterned paper in the central squares and added a sentiment and an image to the centre of these.  I then stamped and masked with the dahlia stamp along the edges. 
The next 'page' already had stamped images, so I continued this around the edge of the cross-shape and added a sentiment in the centre, cutting it in half as before. 
For the last 'page', which becomes the back of the card, I simply stamped the dahlia as for the front but didn't add any images or sentiments.

I have created this card for two challenges:
1. My Time To Craft: #228 Masking
2. Allsorts Challenge Blog: Week 214 - Favourite Things - my favourite things are stamping and flowers


Saturday, 6 July 2013

docrafts Blog: Card Makers Challenge Winner

Thank you to docrafts for choosing my card as the winner.
"docrafts Blog: Card Makers Challenge Winner: A winner has been chosen for the Colour Card Makers Challenge we ran on 27th June. Thank you to everyone who entered! There were so many great cards!
CONGRATULATIONS NICOLA! Please email us your address to tv@docrafts.com and we will send your Ahoy There prize!"

Wednesday, 3 July 2013

Sunset Frame Card

Palm trees have always been one of my favourite things to draw and they always look great against a tropical sunset, so this is the inspiration for my frame card. 

First I found an image of a round wooden frame on the internet.  I edited it in Photoshop before printing onto white card and cutting out.  I took an A4 piece of white card, scored and folded it in half, then drew round the frame making sure it slightly overlapped the fold at the top.  I then cut the card out to the shape of the frame. 
Next I took a few bits of cotton wool and used them to 'paint' a sunset scene on the card with permanent dye inks. (Cotton wool gives a lovely soft feel without any hard edges.)  Using the frame as a size guide, I drew a couple of palm trees onto black card and cut them out.
I added 2mm foam squares to the palm trees and stuck them in place, ensuring the edges would be underneath the frame.  For the frame I used 3mm foam squares to give further dimension and make sure it sat above the palm trees. 
For the tag I used a textured piece of cream card and inked it to blend in with the frame.  I matted a Making Memories sentiment onto black card, glueing it at an angle onto the tag.  I punched a hole and used basic string to complete it before glueing in place onto the frame. 
For the final touch, I added some shimmer chalk to the palm trees and the reflection of the sun on the water. 

I have created this card for two challenges:
1. Crafty Cardmakers: #95 Holiday
2. Joanna Sheen: Don't be square!


Gadget Focus: Crop-A-Dile II (Big Bite)

Punching holes and setting eyelets are a great way to enhance scrapbook pages and cards alike.  I used to use Fiskars eyelet setters which have a built-in spring hammer, but found these quite noisy and not that easy to hold.  
Then I found the Crop-A-Dile II (Big Bite) by We R Memory Keepers.  This great gadget, while larger than it's original form, has an amazing 6" reach so you can punch and set right in the centre of 12"x12" scrapbook pages. 
It has two hole size punches which can easily punch through paper, chipboard, leather, fabric, plastic and thin tin.  The setter has four different settings for small and large eyelets, plus snaps and gromlets, which many basic eyelet setters cannot do. 
If you are just starting with using eyelets, I would definitely recommend this product as being well worth the money. 
Product video on YouTube