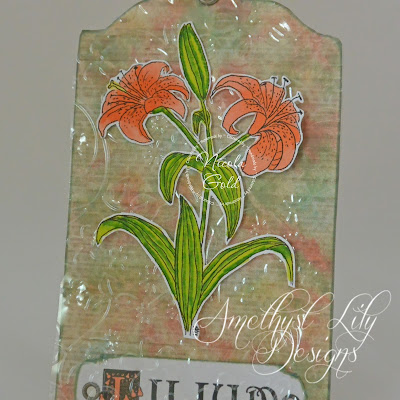
When I started blogging in 2013, I hadn't even heard of Digital Stamps. I was making cards with my toppers and the stash I had. I got a couple of Polkadoodles images free with a magazine, but I still didn't discover the online world of DigiStamps until I found Bugaboo in August 2013. I was colouring with the Caran D'Ache pencils I'd received as a child as this was the only thing I had apart from some dried-up felt pens that I'd had forever.
I continued using Bugaboo stamps and my pencils until I was chosen as a DT member of The Crafter's Cafe in February 2014. That is when I really discovered DigiStamps properly. I was seeing many different companies through the challenge entries and realised so many people were using alcohol markers. What were these magical things? I had to investigate. Of course, many were using Copics, but these were way out of my price range so I opted for ProMarkers. I bought a couple of sets on Amazon and had a play.
Oh boy - if I'd known then what I know now! The 12 pen sets didn't really have colours that blended well together, so it wasn't long before I was looking up blends and buying single markers to complete them. (I'm well on my way to owning the complete collection now, lol). A word of advice to those just buying markers for the first time... buy blending sets in the colours you think you'll use most first rather than just going for the biggest set you can afford.
So I was happy trying to blend in my own way and copying other people who's colouring I really liked. I was probably improving a bit the more I used the pens, but I wasn't really paying attention to the little details like folds and shadows. Then I had my daughter in July 2014 (I already had a 4 year old son). I was GDT for MelJen's Designs at the time and didn't want to let them down! I continued to colour, make cards and blog until February 2015 when we were granted work permits to Canada and I had to put my entire life into boxes. You can read that story on my return blog post here.
I didn't really colour or make any cards for the next year, so my colouring had gone downhill a bit when I started again in May 2016. I carried on as usual then somehow discovered Kit & Clowder through the free wedding rose image and class that Alyce was offering. I admit I was naughty and didn't watch the video completely before I started using the step-by-steps to colour the rose. It was so different from how I would've coloured it on my own though and I thought it looked pretty good.
I was so loving the technique that I did a few different colours. You can see them all on my Instagram (Link in Social Media page).
So that was that... I joined the Kit & Clowder Facebook group and got involved with the challenges there, then I eventually bought a class. You may wonder why people pay for colouring classes when there are oodles just sitting there for free on YouTube. Well... here is why:
Alyce, the owner of Kit & Clowder spends an awful lot of time creating all the classes. She has recently been showing us (The 'Clowdies') her behind the scenes and it's such a lot of work that I'm sure most people on YouTube just wouldn't want to go to the effort for.
The classes always feature great artists and there is always a discount code to use, or you can use any image you already own. Sometimes there is even a freebie image, background or an extra technique class.
You can choose to subscribe to monthly classes (no obligation to continue), buy a year of classes in one go, or go for a technique class. I chose Elements of Nature as there are so many flowers in digital stamps, plus there are scenes in the class where you learn different sky and ground techniques. Also, with this class you get all the digital images included.
I'm now also enrolled in the Monthly Classes as I just couldn't resist the November scene! I haven't been disappointed believe me. Alyce goes through everything in a video for each image/scene and there is a step-by-step booklet to follow.
The best thing about learning with Alyce is the one-to-one feedback, which you are never going to get with freebie YouTube videos. If you're feeling a bit stuck on anything, you can message her for some advice. Once your image is complete, just upload it to the classroom album and Alyce will give constructive criticism as needed, or mega praise if you have done really well.. lol! Being in the Facebook group is also great for feedback and support. It really is a wonderful crafting community which I'm so grateful to be a part of.
OK, enough blurb, let's get onto some photos.
This photo is from a blog post way back in August 2014 (See it here). I was using ProMarkers and tried to get a bit of depth by using a darker colour in the centre of the flowers, but you can see it really lacks detail
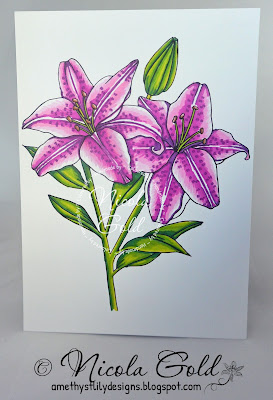
This was my very first class from Elements of Nature. I jumped straight in with the Lilies as they are my favourite flowers. There is still room for improvement here, especially as I wasn't using bleedproof card at the time, but I was so pleased with the results. I never would've thought to colour flowers like this. Watching Alyce colour first then using the step-by-step booklet makes it so easy to learn. It's also really good to refer back to when colouring up other images with flowers in.
This is a gorgeous image from Ching-Chou Kuik called 'Lily'. For this one I Googled lily photos and copied one I liked. Doing the classes has given me the confidence to try techniques that previously looked too difficult.
So that is my journey. I am still constantly learning, as all artists and crafters do, but I am having fun and not being afraid to try new things.
I hope you found this helpful and will consider joining the Clowdies with your own journey.


Isn't it funny looking back at our humble beginnings and realizing how much we have learned without really noticing. When I think back to my beginnings ..I bought a Cricut to do photo mats.. that was all I wanted it for and maybe a vinyl project here and there lol.
ReplyDeleteNow I have craft stuff up the wazoo to do a gazillion different things and do crazy things like put bed sheet through my printer haha
I love crafting..I may not be that great at it.. but I love it and I love developing my sons creativity.. he is so fun to craft with .. almost 5 now.. I wonder if he will always wanna craft with him mommy.
Luckily I have such varied tastes in hobbies, I am sure he will continue to enjoy at least some of them with me.
This is a great post!! The coloring progress is pretty amazing, when you lay before and after pics beside each other!!
ReplyDeleteYou forgot to mention the amazing friends that you make on K&C, LOL ;)
Nicola thank you SO much for sharing your journey! I can't thank you enough for your lovely comments and I'm so glad you are feeling confident in your work. I'm extremely proud of you and have loved to see your journey so far. I can't wait to see how you keep progressing! :) Thank you again so much! <3
ReplyDeleteHi Nicola,
ReplyDeleteI saw your post on the K&C FB yesterday and already lefy a womment there but wanted to come back here to follow you aswell :) So I'm your new follower. I loved to read your story and will write my own soon.
Greetz
Margo
Hi, Nicola! Thanks for sharing about your digital journey - I learned a little along the way as well, and enjoy using them very much. I always enjoy your beautiful coloring and card designs, and these are just as gorgeously done! Thanks again, too, for visiting my blog today and leaving a nice comment. Congrats on your new heat tool. I had to purchase a new one as well, last month. My "Milwaukee" heat tool was purchased in 1989, so it lasted a long time. This time, I purchased a Wagner. It looks just like the Milwaukee, and the manufacturer said it is the same tool. I love being able to dry things quickly, and to emboss.
ReplyDeleteWishing you a lovely week-end! xo